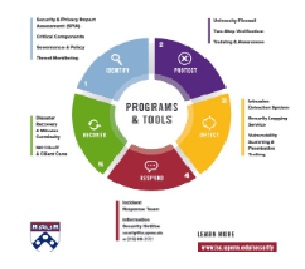
Penn Computing

Penn Computing

Computing Menu Computing A-Z
Computing Home Information Systems & Computing Penn


Sunday, November 8, 2009

 
  Security "Greatest Hits"
Managing Passwords
E-mail Harassment & Forgery
Hoaxes, frauds & scams
Spam
Phishing
Wireless Networking
Encryption & digital signatures
 
  Best Practices
Secure desktop computing
Secure servers
Secure web applications
Secure web development
Secure data deletion
Tips for safe computing
Computing policies
 
  More in-depth information for
Local support providers
System administrators
Application developers
 
  Security initiatives
Critical host compliance
Authentication & authorization
Penn Security & Privacy Assessment (SPIA)
Security Liaisons (Restricted Access)
Secure Share
NeXpose Vulnerability Scanner
 
  Related links
Electronic privacy
PennKey
Viruses
Worms, trojans, backdoors

NeXpose Vulnerability Scanner

Capabilities

  • Remote vulnerability scanning
    • OS: Microsoft Windows, Linux, Solaris, Mac OS, BSD, AIX, AS/400
    • Databases: SQL Server, MySQL, Oracle, PostgreSQL
    • Web: Apache, IIS, QuickTime, Flash, ColdFusion, J2EE, PHP, ASP, ASP.NET
    • Custom web app issues: SQL injection, cross-site scripting, backup script files, readable CGI scripts, insecure use of passwords, leakage of sensitive data
    • Device discovery and fingerprinting
    • Web spidering
    • Default or trivial account credentials
  • Credentials-based scanning
    • Vulnerabilities
    • Insecure configurations
    • Missing patches
    • Spyware
    • OS: Red Hat, SuSE, Solaris, Microsoft
    • Applications: Microsoft products, Real Player, Opera, OpenOffice, etc.

Benefits

  • Low false-positive rate (handled as bugs)
  • Three checks done for each vulnerability
  • New vulnerability checks available within 1 business day of publication
  • Flexible reporting (PDF, HTML, XML, etc)
  • No local software required (browser-based)
  • Separate scanning engine for firewalled hosts

To Use

  • Contact security@isc.upenn.edu to request access for scanning and reporting on your hosts.
    • Provide a list of the IP addresses or hostnames you wish to scan (max 100 per site).
    • Indicate the PennKey usernames of the individuals who should be authorized to run the scans.
    • Indicate which email addresses should be added to our VULN-SCANNER-USERS@lists.upenn.edu mailing list for announcements.
  • Using any Penn-supported browser, log in to NeXpose using your PennKey credentials: https://scanner.security.isc.upenn.edu:3780/
  • Select your site and the scan you wish to run.
  • Set up desired alerts (e.g. upon scan completing, type of vulnerabilities detected), specifying probe.security.isc.upenn.edu as the SMTP relay server.
  • Configure credentials, if desired (for more thorough scan).
  • Advise others that you plan to use the scanner (multiple simultaneous scans can delay completion) using the Provier Wiki.
  • Run scan and generate a report in the format you desire.

Scanning

  • Site Size: the maximum recommended size of a site is 100 hosts.
  • The default scan: ("Full Audit") includes web spidering, which may hang in certain instances (e.g. printers, some dynamically-generated URLs). The workarounds are:
    • Select "Full Audit, no web spidering." Note that checks for SQL injection, cross-site scripting (CSS/XSS), backup script files, readable CGI scripts, and insecure use of passwords will be omitted as well.
    • Ask Information Security to configure a scan template that excludes a certain path (e.g. /calendar). This will allow you to check the rest of your site for vulnerabilities, but still have a scan go to completion.
  • Scan Template Options (contact security@isc.upenn.edu for more details on any of these templates)
  • Length of Scans: a good rule of thumb is that the full audit will take 2 minutes/workstation, and 5 minutes/server. See note above regarding web spidering with the default scan.

Scanning behind a Firewall

If you would like to scan hosts behind a firewall, you may install a NeXpose scanning engine on your local system and use our floating scanner license.

System Requirements:
  • OS: Windows 2000 Server, Windows 2003, Linux
  • Hardware: 2 GHz, 2 GB RAM, 80 GB disk
Instructions:
  • Download NeXpose scanner for Linux or Windows
  • Follow Installation Manual instructions for your platform.
  • Install scan engine only (not typical installation).
  • Open a hole in your firewall to permit traffic from scanner.security.isc.upenn.edu to your host on port 40814.
  • Let security@isc.upenn.edu know the hostname of your host.
  • Once we've added the scan engine, use the scan engine command line (screen -x nexpose on Linux) to enable connection to the scan console (see page 25 of the installation manual).
  • To exit the scan engine command line, type Ctrl, A, and D keys together. Do not use Ctrl-C as this will stop NeXpose.
  • Connect to the NeXpose console to initiate a scan of your site, selecting the scanner you installed.

Reporting

CSV Reports: Although NeXpose can produce a CSV report, the vendor recommends generating an XML report instead, and using this Windows utility to convert it to CSV.

References

NeXpose Quick Install Guide for installing scanner behind firewall
NeXpose Manual for using NeXpose interface
NeXpose Scan Tuning
Presentation at Security-SIG from December 2008

Last updated: Tuesday, September 15, 2009

top

Information Systems and Computing
University of Pennsylvania
Comments & Questions


Penn Computing University of Pennsylvania
Information Systems and Computing, University of Pennsylvania